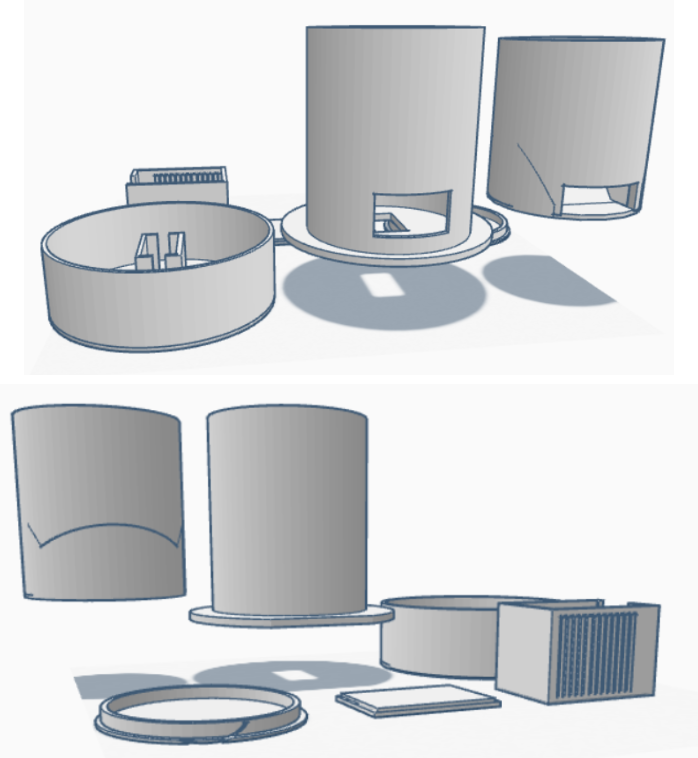
Tiny Dispenser
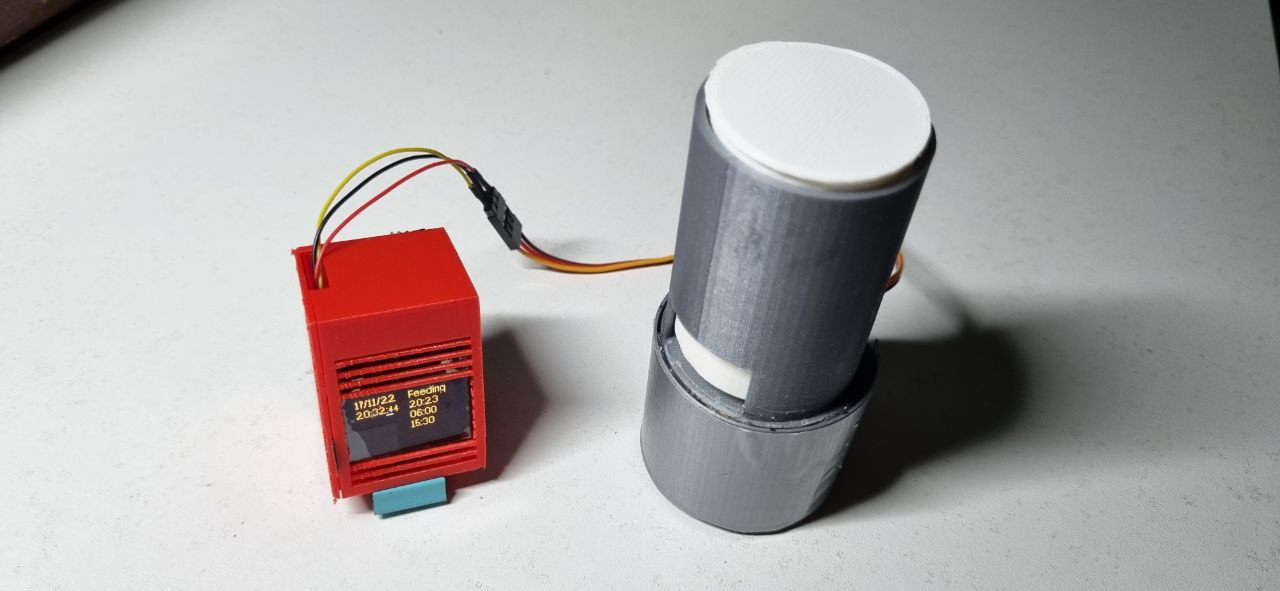 Automated food dispenser for fish tanks that allows users to set up to 3 timings to feed via Bluetooth (BLE) connection to the device. This will provide convenience to users who might not always be home to feed their pets.
There are two main components, the dispensing device and the mobile app for setting the dispensing time.
Automated food dispenser for fish tanks that allows users to set up to 3 timings to feed via Bluetooth (BLE) connection to the device. This will provide convenience to users who might not always be home to feed their pets.
There are two main components, the dispensing device and the mobile app for setting the dispensing time.
Check out the project on YouTube
Hardware
- 01 x TinyCircuits TinyZero
- 01 x TinyCircuits TinyScreen TinyShield
- 01 x TinyCircuits Bluetooth Low Energy TinyShield (ST)
- 01 x TinyCircuits Servo Controller TinyShield
- 01 x TowerPro SG91R Servo (JR)
- 01 x JST-SH Male to JR Male Connector
- 02 x Lithium Ion Polymer Battery, 3.7V 150MAh
- Custom 3D printed parts
Libraries
TinyCircuits official site
- TinyScreen.h - To run the TinyScreen module.
- ServoDriver.h - To run the Servo Controller module.
- STBLE.h - To run the Bluetooth Low Energy (BLE) module.
Arduino libraries
- SPI.h - Allows the exchange of data between the board and Serial Peripheral Interface devices. (TinyScreen)
- Wire.h - Allows communication with I2C devices. (TinyScreen, Servo Controller, BLE module)
- RTCZero - To keep track of time for matching to feeding timings.
Main Program
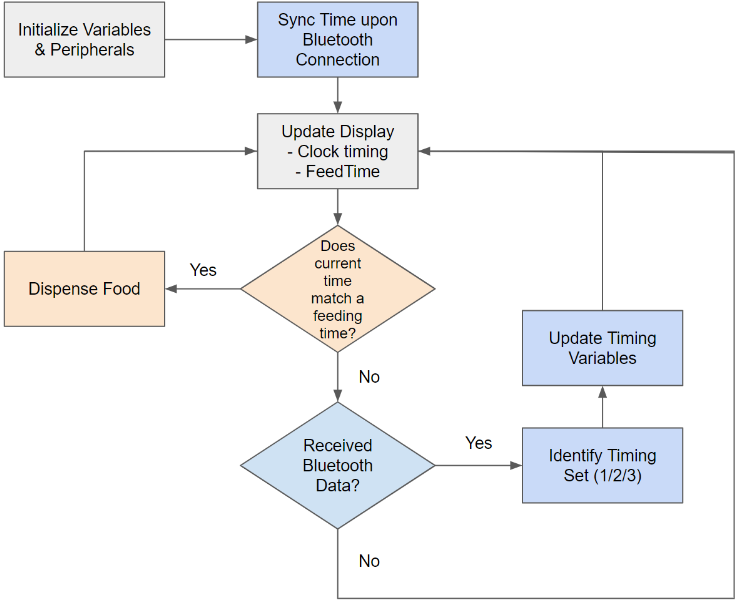
During initialization, the program initialize the variables and peripherals. Upon connection from the mobile app via Bluetooth, the real-time clock is automatically synced. The program main loop will constantly do the following:
- Update the real-time clock.
- Dispense food if the current time matches any of the set timings.
- Update set timings accordingly based on Bluetooth data received.
Tracking & Storing Time
We define a timeData struct from variable.h that is used for the tracking of the current time with the RTC library.
struct timeData {
    byte seconds;
    byte minutes;
    byte hours;
    byte day;
    byte month;
    byte year;
};
The timings are set by creating and initializing td[4], an array of size 4, and setting the default dispense timings to 0600, 1200, and 1800.
// Set date & time for actual time
td[0].seconds=1;
td[0].minutes=1;
td[0].hours=1;
td[0].day=1;
td[0].month=1;
td[0].year=1;

// Set date & time for 1st feeding time
td[1].seconds=0;
td[1].minutes=0;
td[1].hours=6;
td[1].day=0;
td[1].month=2;
td[1].year=02;
...
The RTC time is updated to be displayed on the screen. The TimingX variables are used to store the default timings or previous set timings and return to the mobile app.
rtc.setTime(td[0].hours, td[0].minutes, td[0].seconds);
rtc.setTime(td[0].day, td[0].month, td[0].year);

char Timing1[5] = "0600";
char Timing1[5] = "1200";
char Timing1[5] = "1800";
Handling Bluetooth Data
Upon establishing a Bluetooth connection with the mobile app, the device will send the previous set timings, or default if no timing was set before. We create an 18-character array called data[] with A, B, and C in positions 0, 6, and 12 which represent the start point of timings 1, 2, and 3 respectively.
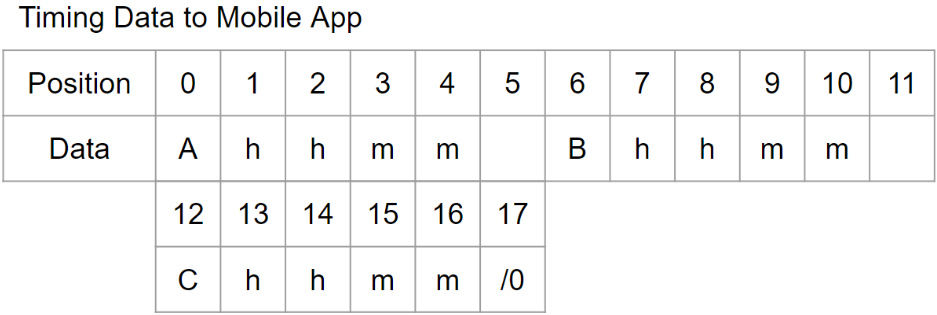
We then use for loops to assign the stored timing data from TimingX variables to data[] at positions 1 - 4, 7 - 10, and 13 - 16, with whitespace in between each timing. Before sending, data[] is converted into ASCII for handling in the mobile application. Finally, the lib_aci_send_data() function from UART.ino handles the sending of data. These operations are performed in sendBackTiming().
void sendBackTiming(void) {
    char data[18] = "A     B     C    ";
    // loop through Timing1 time, insert into data. format A1234.
    // First timing 1234pm
    for (int i = 1; i<6;i++){
        data[i] = Timing1[i-1];
    }
    // loop through Timing2 time, insert into data. Eg. A1234 B1330.
    // First timing 12.34pm second timing 1.30pm.
    for (int i = 7; i<12;i++){
        data[i] = Timing2[i-7];
    }
    // loop through Timing3 time, insert into data. Eg. A1234 B1330 C1830.
    // First timing 12.34pm, second timing 1.30pm, third timing 6.30pm.
    for (int i = 13 ; i<17;i++){
        data[i] = Timing3[i-13];
    }
    // Convert to ascii
    for (int i = 0; i<strlen(data);i++){
        data[i] = (int) data[i];
    }
    // initalize sendBuffer
    uint8_t sendBuffer[21];
    uint8_t sendLength = 0;
    // As data will always be 17 characters long loop and insert into sendBuffer
    while (sendLength < 17) {
        sendBuffer[sendLength] = data[sendLength];
        sendLength++;
    }
    sendBuffer[sendLength] = '\0'; //Terminate string
    sendLength++;
    // Method called to send data
    if (!lib_aci_send_data(PIPE_UART_OVER_BTLE_UART_TX_TX, (uint8_t*)sendBuffer, sendLength))
    {
        SerialMonitorInterface.println(F("TX dropped!"));
    }
}
The Bluetooth data received from the mobile app is in the following format as illustrated in Figure 3. The current time data is identified by the preceding D, followed by the DateTime data. The dispensing timing data set by the user are differentiated by the preceding TimingX followed by the time data.
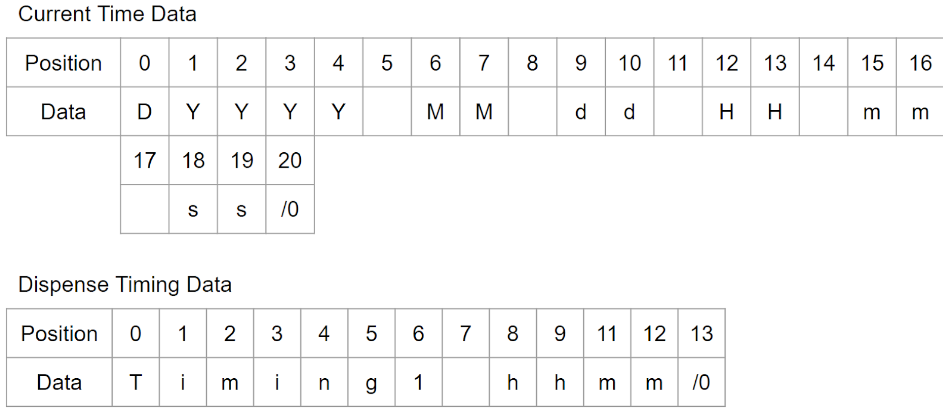
If the data received is the current time, the updateTime() function is used, passing the Bluetooth data in ble_rx_buffer[] incremented by 1. This will pass the time values without the preceding D identifier.
// When any data is received
while (ble_rx_buffer_len){
    // Identifer preceeding current time data
    if (ble_rx_buffer[0] == 'D')
    {
        SerialMonitorInterface.println("Setting time");
        // data +1 to exclude identifier
        updateTime(ble_rx_buffer+1);
        sendBackTiming();
    }
    ...
}
We use strtol() to tokenize the time values separated by whitespace assigned to the timeData variable td[0]. For the next strtol() call the next will point to the whitespace, which would be skipped and parse the next value.
// Update the current time on device
void updateTime(uint8_t * b)
{
    int y,M,d,k,m,s;
    char * next;
    // Get timing parameters from received data
    y = strtol((char *)b, &next, 10);
    M = strtol(next, &next, 10);
    d = strtol(next, &next, 10);
    k = strtol(next, &next, 10);
    m = strtol(next, &next, 10);
    s = strtol(next, &next, 10);

    // Store current time data
    td[0].seconds=s;
    td[0].minutes=m;
    td[0].hours=k;
    td[0].day=d;
    td[0].month=M;
    td[0].year=22;

    // Update current time on device
    rtc.setTime(td[0].hours, td[0].minutes, td[0].seconds);
    rtc.setDate(td[0].day, td[0].month, td[0].year);
}
If the first character of the data is not D, then the program will check if the identifier is 1, 2, or 3. We make compare the value of the character in position 6 of the Bluetooth data, we then use memcpy() to extract:
- The full timing in
hhmmtoTimingX[]variable - The hour and minute separately to set as respective
td[i].
// Modify timing variables based on identifer
if (ble_rx_buffer[6] == '1') {
    SerialMonitorInterface.println("Case 1");
    // Set value of Timing1 for sending time to mobile app.
    memcpy(Timing1,&ble_rx_buffer[8],4);
    // Get hour of Timing1 (hh)
    char firstTwoChar[2];
    memcpy(firstTwoChar,&ble_rx_buffer[8],2);
    // Get minutes of Timing1 (mm)
    char lastTwoChar[2];
    memcpy(lastTwoChar,&ble_rx_buffer[10],2);
    // Update timing
    td[1].hours = atoi(firstTwoChar);
    td[1].minutes = atoi(lastTwoChar);
    display.clearWindow(50,10,46,40);
}
Updating Display
We have 2 functions in the main loop that handles the displaying of the current DateTime and set timings to the screen in the layout. The setCursor() function is used for positioning.
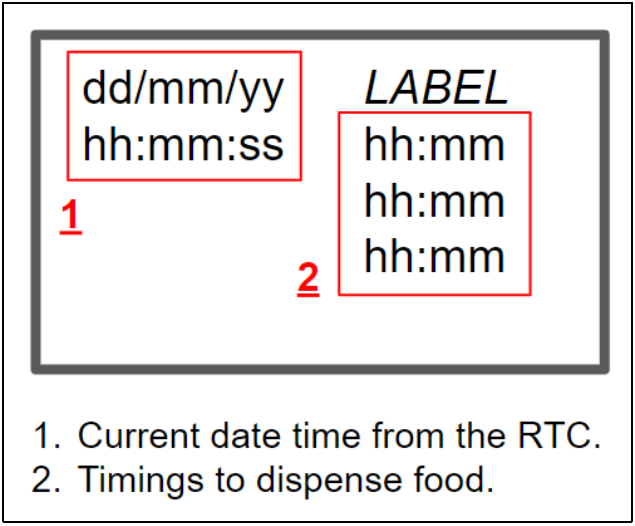
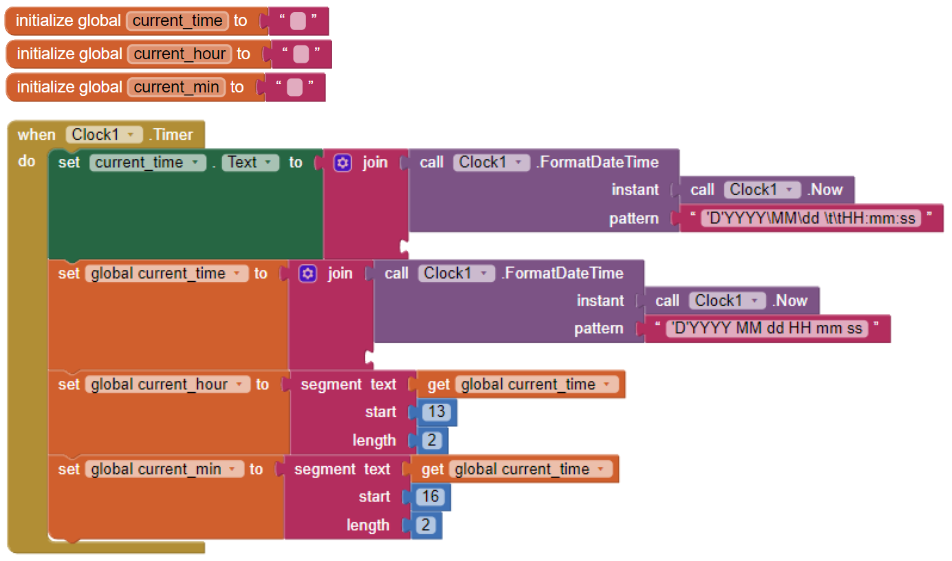
In function printTime(), the current day, month, year, hour, minute, and second is retrieved from the RTC and written to the character array temp1 using sprintf(), adding 0 to a single digit parameter, before printing to display.
// Display Date and time on screen
void printTime(void) {
    display.setFont(liberationSansNarrow_8ptFontInfo);
    display.setCursor(0, 0);
    sprintf(temp1, "%02d", rtc.getDay());
    display.print(temp1);
    display.print("/");
    sprintf(temp1, "%02d", rtc.getMonth());
    display.print(temp1);
    display.print("/");
    sprintf(temp1, "%02d", rtc.getYear());
    display.print(temp1);
    display.setCursor(0, 12);
    sprintf(temp1, "%02d", rtc.getHours());
    display.print(temp1);
    display.print(":");
    sprintf(temp1, "%02d", rtc.getMinutes());
    display.print(temp1);
    display.print(":");
    sprintf(temp1, "%02d", rtc.getSeconds());display.print(temp1);
}
In the function printFeedTime(), we use a for loop for obtaining set timings 1,2,3 from timeData variable td[4]. The sprintf() function is used to write the hour and minute of the time data in td[i] to character array temp1 and temp2 respectively, before combining using strcpy() and strcat() into array tempcombine[10] to be displayed.
As these functions are called in the main loop, this ensures that the RTC and timing updates are reflected on the screen.
// Display the 3 timings to dispense food
void printFeedTime(timeData * td){
    // display.drawRect(50,10,46,40,1,0x6D);
    display.setCursor(50, 0);
    display.print("Feeding");
    for(int i=0; i<3; i++){
        display.fontColor(0x1F, 0x0000);
        display.setCursor(50, 12+i*12);
        sprintf(temp1, "%02d:", td[i+1].hours);
        sprintf(temp2, "%02d", td[i+1].minutes);
        char tempcombine[10];
        strcpy(tempcombine, temp1);
        strcat(tempcombine, temp2);
        // tempcombine is the feeding time string in the format hhmm e.g. 2330
        display.print(tempcombine);
    }
}
The checkifFeedTime() function uses a for loop to compare the set timings stored in timeData variable td[4] to the current time obtained from the RTC. rtc.getSeconds() is set to 0 as it would otherwise cause the servo to rotate continuously.
// Dispense food if the current time matches any of the set timings
void checkifFeedtime(){
  // Loop through td that stores the 3 timings
  for(int i=0; i<3; i++){
    if((rtc.getSeconds()==0)&&(rtc.getMinutes()==td[i+1].minutes)&&(rtc.getHours()==td[i+1].hours)){
      dispense();
    }
  }
}
The dispense() function is called when the time matches to dispense food by rotating the servo, set to rotate 90 degrees and back.
void dispense(){
    servo.setServo(1, 750);
    servo.setServo(2, 750);
    servo.setServo(3, 750);
    servo.setServo(4, 750);
    delay(2000);
    servo.setServo(1, 1750);
    servo.setServo(2, 1750);
    servo.setServo(3, 1750);
    servo.setServo(4, 1750);
}
Mobile Application
UI & Functionality
MIT app inventor was used to create a simple mobile application for setting the dispenser feed time. The functions are as follows, with the respective code blocks.
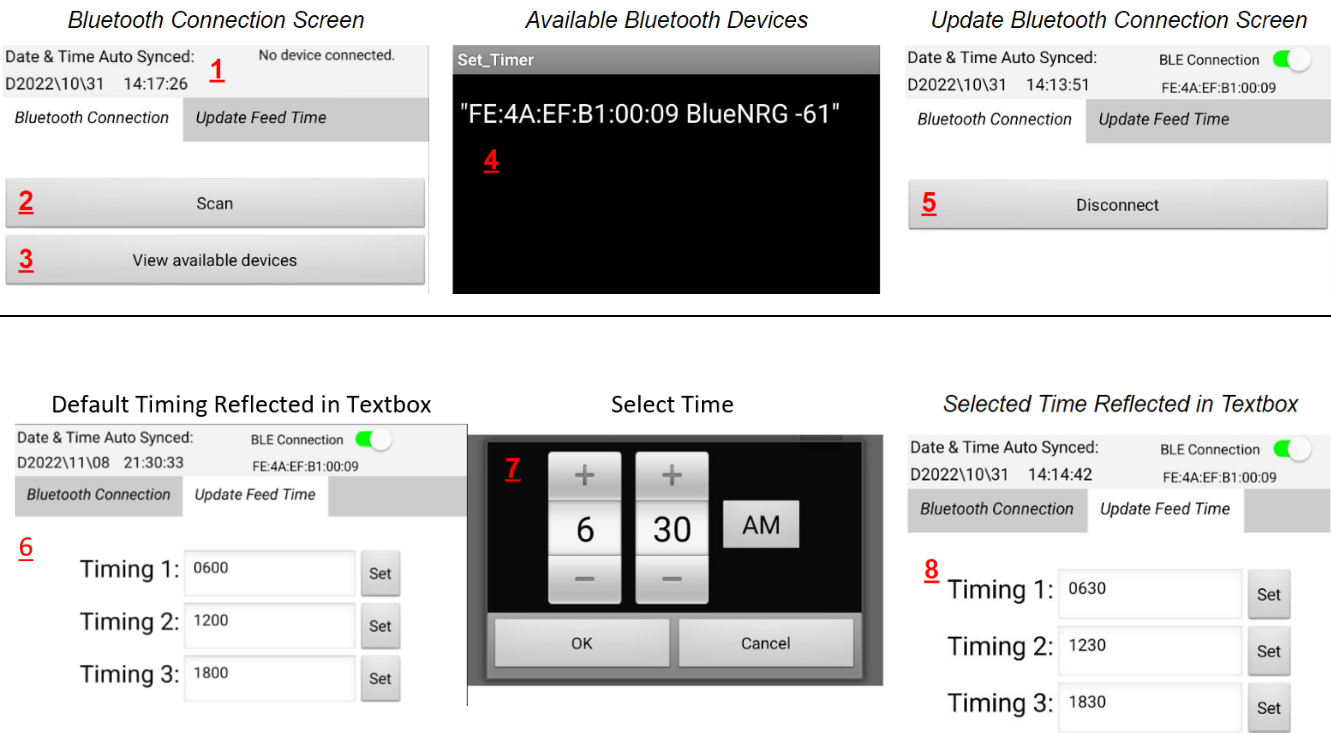
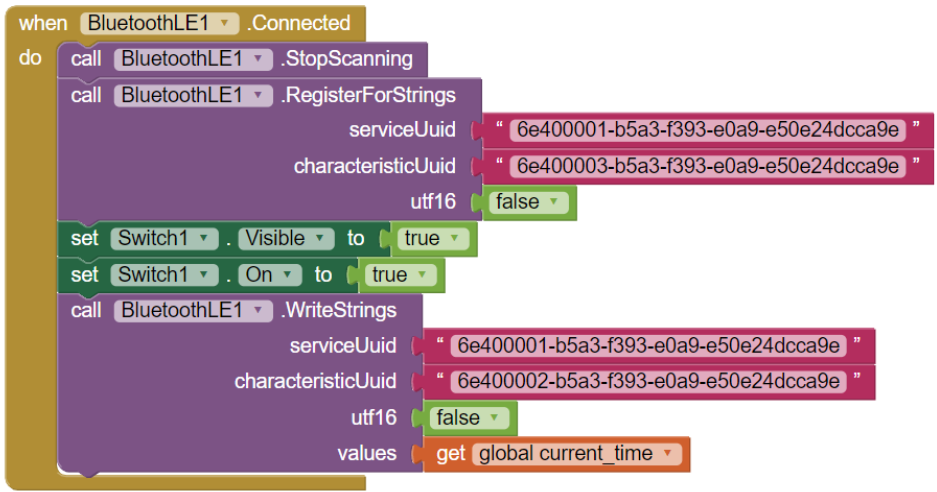
- Datetime data to be synced with the device and Bluetooth connection status.
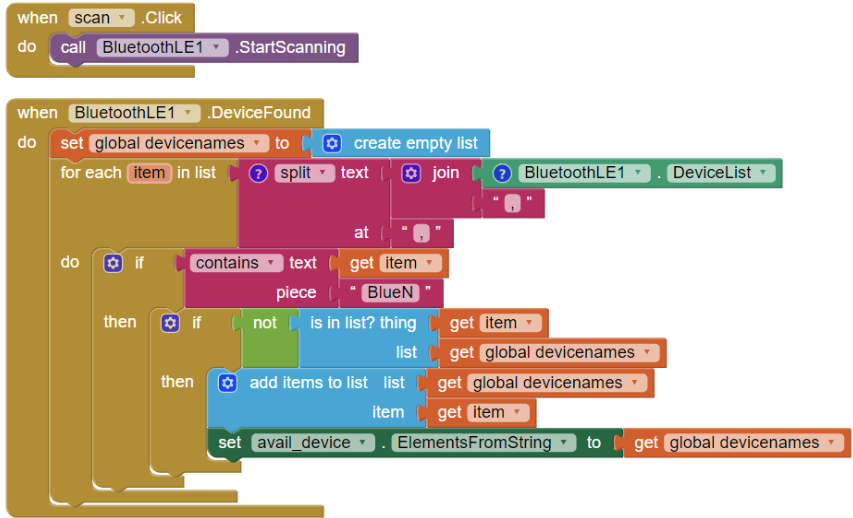
- Scan for Bluetooth devices (ID = scan).
- View available devices after scanning (ID = avail_device).
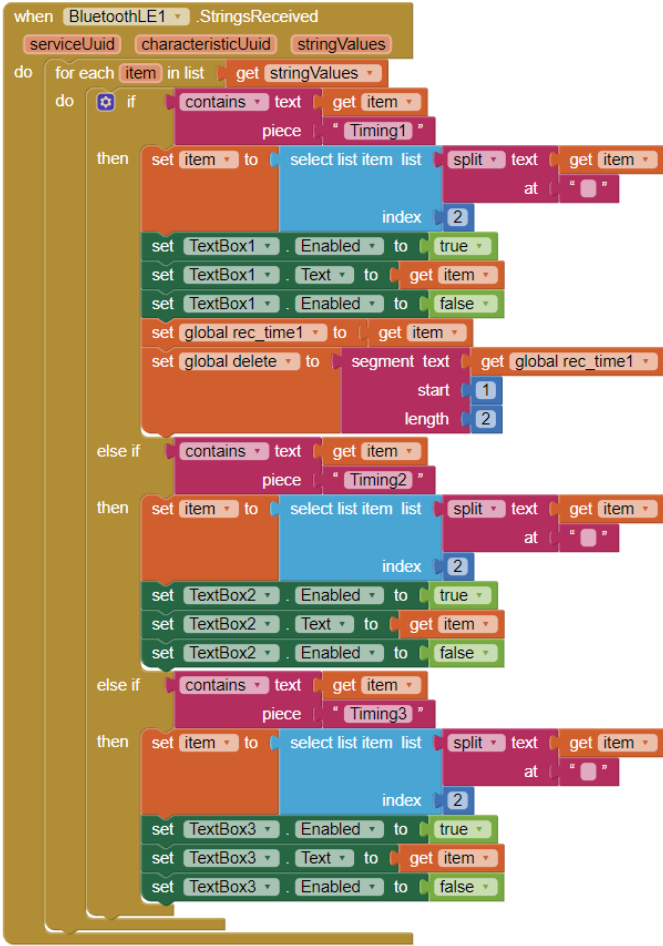
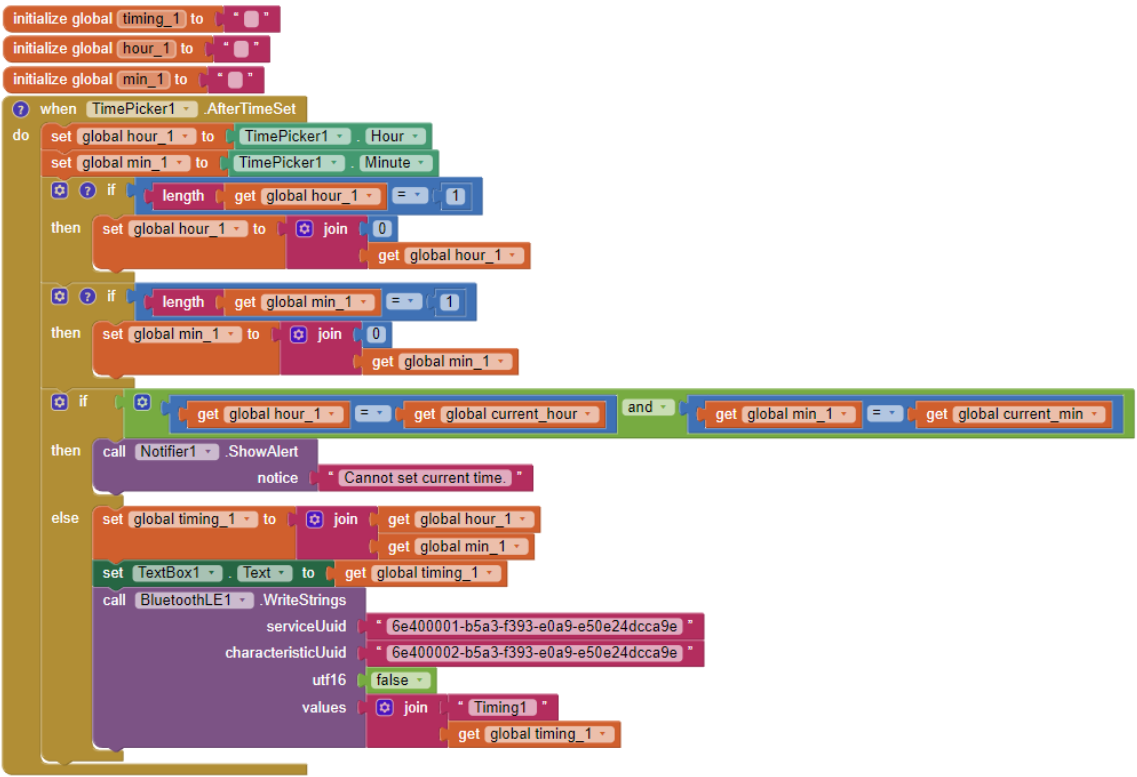
- List of available Bluetooth devices to connect to from. Upon connection, the current time is sent to the device, and the app listens to any sent from the device. If any, the previous set timing is received from the device and is displayed on the time picker textbox.
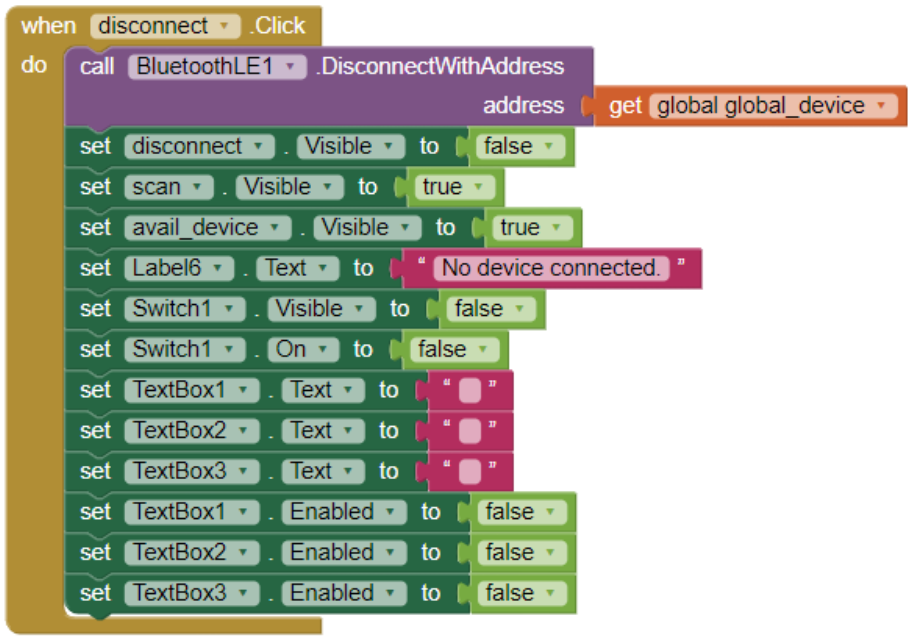
- UI will update to show the disconnect button (ID = disconnect).
- Timepicker to set timings (ID = TimePicker1/2/3) in the set timing screen. Previously set timings are retrieved from the device, not reflected in the screenshot.
- Timepicker interface. When selecting the time from the time picker, we perform a join operation on any single-digit hour or minute value, which always results in a 4-digit value. Upon pressing ‘OK’, the timing will be sent to the device. Timing will not be set if it is the same as the current time.
- Selected timings are updated on the textbox.
UUIDs
To send and receive Bluetooth data, we utilize the Nordic UART Service. The 128-bit Service UUID (Universally Unique Identifier) and Characteristic UUID for uniquely identifying information are defined in the UART.ino.
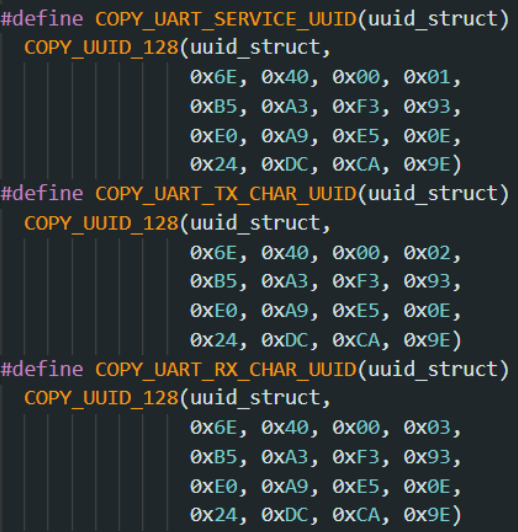
In the mobile app, we attach these UUIDs to the Bluetooth Low Energy (BLE) object to perform Bluetooth transmissions.
          Service: 6e400001-b5a3-f393-e0a9-e50e24dcca9e
RX Characteristic: 6e400002-b5a3-f393-e0a9-e50e24dcca9e
TX Characteristic: 6e400003-b5a3-f393-e0a9-e50e24dcca9e
- (xxxxxxx1) is always the Service UUID
- (xxxxxxx2) is the Characteristic UUID for sending data (TX)
- (xxxxxxx3) is the Characteristic UUID for receiving data(RX).
Photos
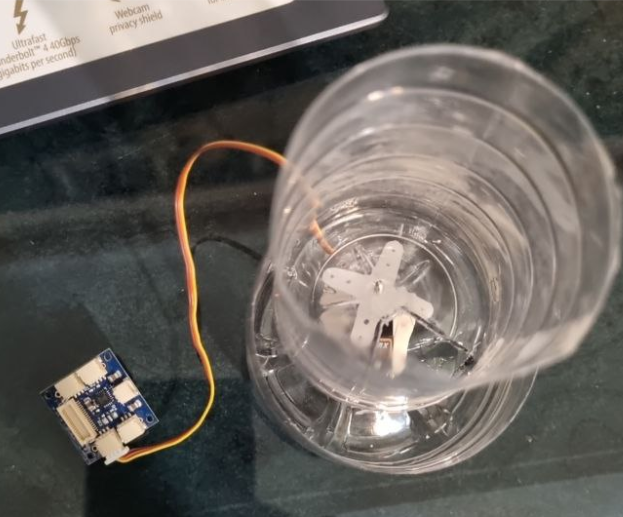
Testing rotation mechanism with prototype 1
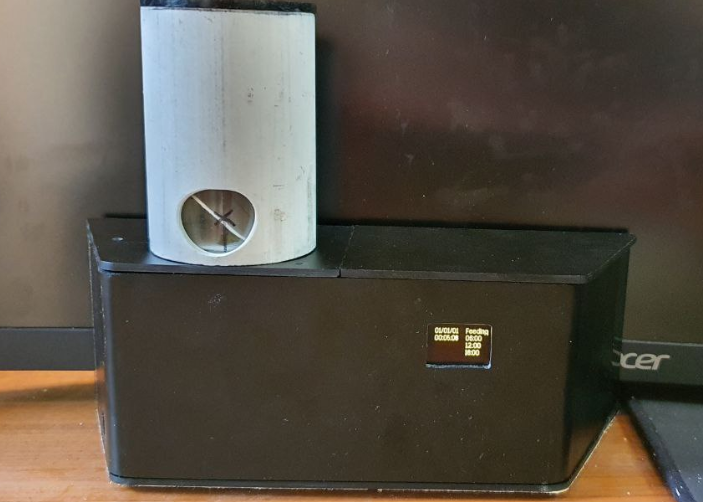
Front view of prototype 2
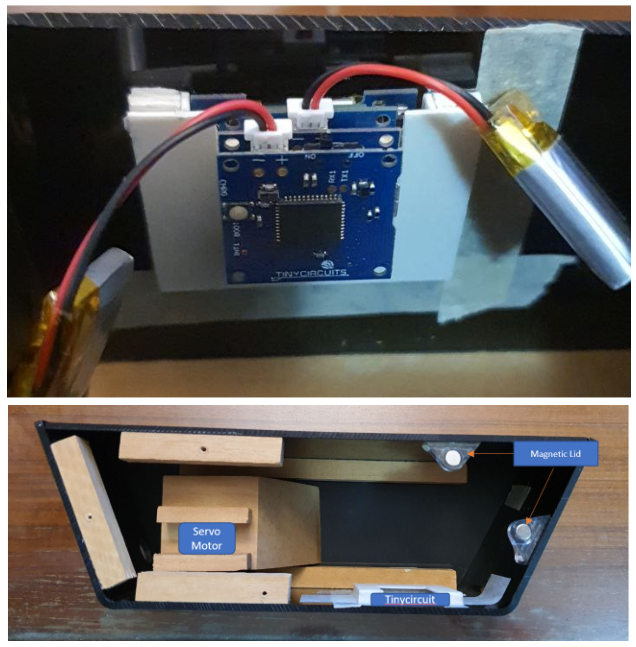
Internal view of prototype 2
3d model design using TinkerCad
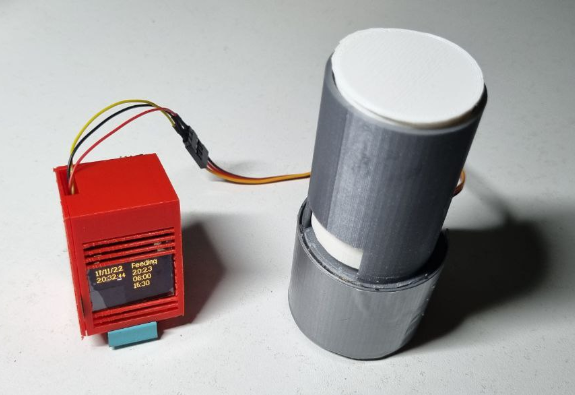
Final prototype
Similar Work
- Smartwatch project by TinyCiruits - We made use of the UART.ino library used in this project to implement our Bluetooth Low Energy (BLE) functionality (Ref 7, 10). The project also utilizes the RTCZero library that is compatible with the TinyZero board which tracks DateTime (Ref 4).
- Cat Feeder by Alexander (Sasha) Ulitin - This project was used as a reference for the physical design of the dispenser (Ref 13).
- MIT App Inventor mobile app projects - The implementation of Bluetooth in these projects were used as a reference for piecing together the BLE functionality in our app (Ref 15, 16).
References
- C Library Function - strtol(). Tutorials Point. (n.d.). Retrieved November 2, 2022, from https://www.tutorialspoint.com/c_standard_library/c_function_strtol.htm
- C struct. Programiz. (n.d.). Retrieved November 2, 2022, from https://www.programiz.com/c-programming/c-structures
- Nordic Semiconductor. (n.d.) UART/Serial Port Emulation over BLE planetleak. (2014, February 27).
- App Inventor 2 tutorial - android receive data from Arduino via HC-06 bluetooth. YouTube. Retrieved November 2, 2022, from https://www.youtube.com/watch?v=xjtxrxVauZg RTCZero. RTCZero - Arduino Reference. (n.d.). Retrieved November 2, 2022, from https://www.arduino.cc/reference/en/libraries/rtczero/
- SPI. SPI - Arduino Reference. (n.d.). Retrieved November 2, 2022, from https://www.arduino.cc/reference/en/language/functions/communication/spi/
- TinyCircuits . (n.d.). TinyZero setup tutorial. TinyCircuits Docs. Retrieved November 2, 2022, from https://learn.tinycircuits.com/Processors/TinyZero_Setup_Tutorial/
- TinyCircuits. (2016, March 14). TinyScreen functions. O Watch - A Smart Watch Kit for Kids. Retrieved November 2, 2022, from http://theowatch.com/learn/o-watch-tinyscreen-programming/tinyscreen-functions/
- TinyCircuits. (n.d.). Bluetooth Low Energy TinyShield (ST) tutorial. TinyCircuits Docs. Retrieved November 2, 2022, from https://learn.tinycircuits.com/Communication/Bluetooth-Low-Energy_TinyShield_Tutorial/
- TinyCircuits. (n.d.). Servo controller tinyshield tutorial. TinyCircuits Docs. Retrieved November 2, 2022, from https://learn.tinycircuits.com/Motors/Servo-Controller_TinyShield_Tutorial/
- TinyCircuits. (n.d.). TinyScreen Smart Watch Kit.
- TinyCircuits. Retrieved November 2, 2022, from https://tinycircuits.com/products/tinyscreen-smart-watch-kit
- TinyCircuits. (n.d.). TinyScreen TinyShield. TinyCircuits Docs. Retrieved November 2, 2022, from https://learn.tinycircuits.com/Display/TinyScreen_TinyShield_Tutorial/
- TinyCircuits. (n.d.). TinyScreenReferenceManual. TinyCircuits. Retrieved from https://usermanual.wiki/Pdf/TinyScreenReferenceManual.1153252474.pdf
- Ulitin, A. S. (2017, December 25). How to build a smart arduino cat feeder. YouTube. Retrieved November 2, 2022, from https://www.youtube.com/watch?v=dqr-AT5HvyM
- Wire. Wire - Arduino Reference. (n.d.). Retrieved November 2, 2022, from https://www.arduino.cc/en/Reference/Wire
- YouTube. (2016, July 4). App Inventor 2 : Android receive data from Arduino via Bluetooth. YouTube. Retrieved November 2, 2022, from https://www.youtube.com/watch?v=0EnRCeLV_0o
- YouTube. (2016, October 12). Create a bluetooth app and control the Arduino. YouTube. Retrieved November 2, 2022, from https://www.youtube.com/watch?v=evVRCL9-TWs